JoJo Maman Bébé Product Onboarding & Set Up - No Preview
No Preview Product Onboarding
Prepared by Anna Britton (Paid Services Specialist) & Cobi Martin (Training and Documentation Coordinator)
The following document has been written to aid JoJo Maman Bébé Fulfillers with creating products which need to be set up as non-live preview lines.
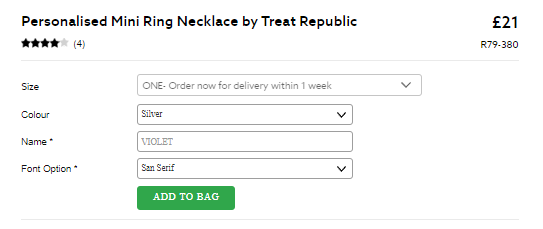
Note: Non-Live Preview refers to lines that do not have a preview that loads within an iFrame. The products will appear like the below image for No Preview lines.
Regarding getting the products into the Kornit X Product Onboarding System this will be covered by the PIF sheet you will have provided the JoJo Maman Bébé team with previously.
To access this system please refer to the following link – CLICK HERE.

A user will already have been created by the Kornit X team and these login details will be provided before accessing document.

Non-Live Preview lines do not require imagery, all imagery MUST be provided to JoJo Maman Bébé before lines can go live.
This document has been split into the following areas, every section has been aided by imagery and video tutorials.
Product Allocation
- Allocate products to your user
- Prepare products for creation
Basic Product Setup
- Set product type
- Add aspect imagery
Product Personalisation & Functionality
- Add personalisation fields
- Types of text areas
- Formatting, Validation & Input rules
- Product Details / App Defaults
ECommerce Data Updates
Product Submitting & Approval
Product Allocation
Every part of this section will be done within the “Product Onboarding” menu. To access this simply head to “Platform” > “Catalog” > “Product Onboarding”.
Allocate Products to Your User
First, you need to allocate the products to your user. The correct user should be the only one that appears in the dropdown for you. To do so following the steps.
Click the “Waiting to Start” link to access the products. Go through and tick all of the products you wish to setup.

Press the “Bulk Edit” button to get the following window. From the dropdown for “Allocated User” you need to select the user you are currently signed in as. By doing so this will move the products to ‘Allocated’ on the Dashboard.
Prepare Products for Creation
You will now be able to access your “Allocated” products. To do so simply click on the number of lines and you will be taken to a view to see all of the “Allocated” lines. The following are the steps to take to get these lines ready.
- Work can be done on products on a 1by1 basis. Simply head to the “Actions” menu and select “Edit”.
- First you need to select the “Start” button which will move the product statis over to “In Progress” on the Product Onboarding dashboard.
- Now the products status has been updated you can now select the “Open Product” button to open the product in a new tab.
The following steps refer to getting your product ready to be Non-Live Preview. To do so the product typing has to be updated and a blank aspect image needs to be added. These steps are needed as a majority of lines work within iFrames so Non live preview lines need these additional steps to ensure these will pass through to the JoJo Maman Bébé team.
Set Product Type
When you open the product you will see the following view, the product will be preset with the types of “Customisable” and “No Preview” but the following changes need to be made.
The first option that needs to be enabled is the type “Stock”. By setting this type you can ensure the product will become visible in the Kornit X Stock Inventory.
Finally, you need to “Save”.
The next part of the setup refers to the Aspect image which we need to add into the ”Preview " in the previous section of the document.
First head to the “Aspects”, you should see an aspect labelled as “Dummy”
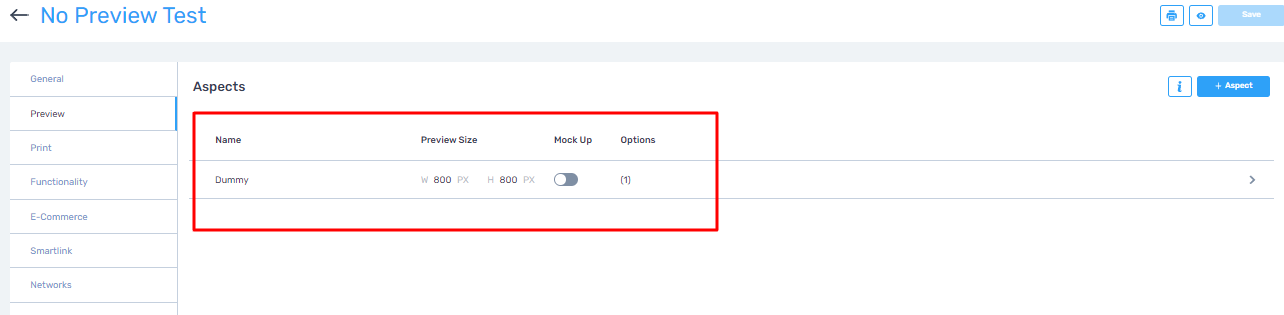
Click on the edit button and now you can upload your image

Upload a blank 800 x 800 px image to ‘Main Image’. 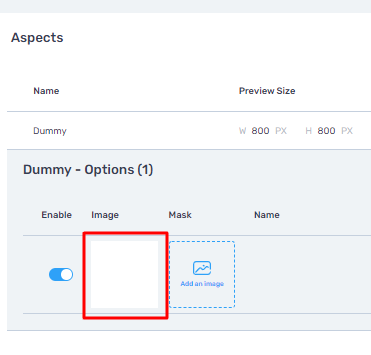

Product Personalisation & Functionality
Add Personalisation Fields
Following on from adding the aspect you can head over to the “Functionality” tab, here you can see a field for a Text Area.
First step here is to create a text area. To do so simply click the “Create a Text Area” button.
Once the text area has been created you need to assign the text area to the “Dummy” print area shown below.
To start a name for the text area can now be set. Most common examples include “Name”, “Initials” and “Personalisation”.
With the name now set, we can move onto the next section of the setup.
Formatting, Validation & Input Rules
The text area has been set; however, you now need to set additional elements on the text area, this is to ensure the set-up matches what JoJo Maman Bébé require.
Head to the “Behaviour” menu and here you can set “Placeholder Text”. Please set an example of text which ideally can match the imagery that is going to be used for JoJo Maman Bébé.
Once “Placeholder Text” has been added please head to the “Formatting” and you can now set “Force Casing”. Here you can choose from the options of “Upper”, “Lower” or “Title”. Typically, “Title” is the most commonly used “Force Casing”.
Once “Formatting” has been set we can enable a few options such as ensuring “User Input Required” is ticked to make sure personalisation is mandatory.
“Max Characters” can now be set and here we advise adding a limit to the amount of text that can be printed on your lines. If a simple name input we recommend 12 being set.
Finally, within the “Validation” menu please set an “Input Rule”. We recommend selecting the “ASCII” rule which will prevent any special characters or emojis from being submitted.
If multiple text areas are needed you can duplicate text areas and here you can amend a text area or set one of our examples. To duplicate a text area simply head back to the main “Text” section, select the area and from the dropdown select “Duplicate”.
For information on the types of text areas please look below.
Types of Text Areas
Standard Text Input (Name, Message, Initials etc)
Options / Type / Standard
This allows you to add a simple Text Input Box for the customer to complete. Add ‘Placeholder Text’ to give the customer an example.
Date Picker / Calendar
Options / Type / Date Picker’
This allows a calendar to be used within the app. Date format can also be specified here.
Dropdown List
‘Option Entries’
This allows you to add a dropdown list of selectable options for the customer to select. Placeholder Text can be added for the default option.
Product Details / App Defaults
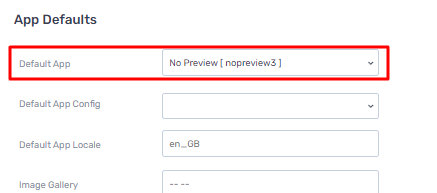
The products need to load within an app to ensure the Kornit X team can approve the lines for you. The following points show you how best to set this. Head to the “Product Details” tab and within the “App Defaults” menu you can set the default app to be “nopreview3”.
Now set, simply save the screen and if you wish to open the product within the app just click the “Open App” button.
Ecommerce Data Updates
There is no need to amend any of the set eCommerce data. Please note JoJo Maman Bébé will already have this data but when they are passed to Kornit X the product names are abbreviated. Please do not amend the following 2 areas.
Name
Retail SKU
As for areas you can change, if a Manufactures SKU is needed you can amend the Fulfiller SKU as this will not have an effect on JoJo Maman Bébé. If you update the Fulfiller SKU you will need to update Variants and Variant SKUs which you may be using on stock lines.
Product Submitting and Approval
Once the Products are ready all you need to do is send them over to Kornit X to approve them. Once Kornit X approve lines the JoJo Maman Bébé team will then be able to approve your lines for you. The below list will document how to send them to approval and how to deal with any rejections.
Once your product is done, please close your tab and you will be able to see the Product list view
If you are happy with the product, press the “Submit for Approval” button
Once you submit this for approval the Kornit X team will be able to approve your lines. This will update the dashboard view to show “Awaiting Supplier Approval”
As soon as Kornit X check your products, if they are happy they will send the products over to JoJo Maman Bébé for approval. The status will then be updated to “Awaiting Retailer Approval”.
When JoJo Maman Bébé approve they will finally move onto the “Ready For Publishing” status, this is when the products will go live on the JoJo Maman Bébé website. However, Kornit X or JoJo Maman Bébé may reject the products. If they do so the products will be pushed back to Allocated on the dashboard. The products will be flagged with an alert to review the lines.
Kornit X and JoJo Maman Bébé will leave comments on failed lines. To view this click on the line and open the “History” tab as shown below.
Related Articles
JoJo Maman Bébé Product Onboarding & Set Up - Live Preview
JoJo Maman Bébé Live Preview Product Onboarding Prepared by Anna Britton (Paid Services Specialist) & Cobi Martin (Training and Documentation Coordinator) The following document has been written to aid JoJo Maman Bébé Fulfillers with ...
JoJo Maman Bébé Live Preview Product Onboarding – Gift Card Creation
Live Preview Product Onboarding Gift Card Message Creation Prepared by Anna Britton (Professional Services Specialist) & Cobi Martin (Training and Documentation Coordinator) The following document has been written to aid JoJo Maman Bébé Fulfillers ...
JoJo Maman Bébé | Technical Documentation Summary
The following contains a list of the available JoJo Maman Bébé technical documentation created by the Kornit X team. Product Management Personalised Product Onboarding & Set Up Personalised Products - Live Preview >> Personalised Products - No ...
JoJo Maman Bébé Integration Guide - Kornit X Platform For Personalised
Personalised Suppliers Using The Kornit X Platform Prepared by Anna Britton (Professional Services Specialist) & Cobi Martin (Training and Documentation Coordinator) The following document has been written to aid JoJo Maman Bébé Personalised ...
**Next | Product Management | Live Preview
Next Product Onboarding Live Preview Welcome to the Kornit X Platform Kornit X is happy to welcome you to the platform. We work closely with Next to allow fulfillers to set up their personalised products to be ready for sale on the Next website. The ...