RIP Integrations : Caldera RIP
Introduction

How to set up Amazon S3
- In your AWS Account navigate to S3
- Create a bucket for these files (for the example we will call this “DTFBucket1”) - take note of the region that you host this bucket in, the region can be any and ideally should be the closest to your Caldera machine geographically.
- Once created navigate to AWS IAM (which is where users are managed in AWS)
- Create a new “Policy” (for this example we will call this “DTFBucket1-policy”)
- On this policy you should be able to switch to JSON view and you can add the following (making sure to replace with your bucket name)
- Create a new “User Group” (for this example we will call this “DTFBucket1-group” and allocate the “DTFBucket1-policy” to it
- Create a new user (making sure to select that access will be programmatic and key based) assigning it to the user group you created.
- AWS will confirm user creation and provide you with an Access Key and Secret Key

Setting up the Kornit X Caldera RIP Integration
Under SETTINGS > COMPANIES, each Production Centre in the Kornit Platform has a tab called “RIP Integrations”, on each the RIP Integration called “Caldera RIP” needs to be configured. They can use the same AWS S3 Credentials but the Input folder will differ.
The screenshot below shows the integration settings, the numbers in red have been added and a guide below explains what should be added to these
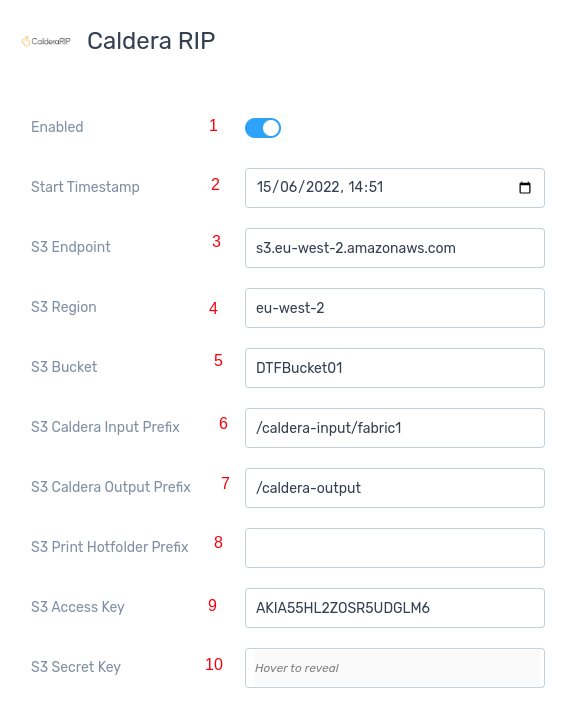
1 - Enabled = Toggle on or off to enable the integration
2 - Start Timestamp = mm/dd/yyy hh:mm field, any production jobs created before this time will be ignored by the integration
3 - S3 Endpoint = The s3 endpoint should be added and this differs depending on the region the bucket was created in so “s3.eu-west-2.amazonaws.com” for example, the format is “s3.region.amazonaws.com”. This field will be the same on every production centre.
4 - S3 Region = The region the S3 bucket was created in should be added here, for example “eu-west-2”. This field will be the same on every production centre.
5 - S3 Bucket = The name of the bucket created to store these files, in our example in this document this was “DTFBucket1”. This field will be the same on every production centre.
6 - S3 Caldera Input Prefix = This is the directory in the bucket that files sent to be RIPed will be stored, we recommend this be set as “/caldera-input/fabricname” where fabricname is replaced with a the name of this fabric, lowercase with no spaces. This field will be different on each production centre
7 - S3 Caldera Output Prefix = This is the directory in the bucket that files that have been processed by Caldera will be passed back to Kornit X, we recommend this be set as “/caldera-output”. This field will be the same on every production centre.
8 - S3 Print Hotfolder Prefix = THIS SHOULD BE LEFT BLANK UNLESS PRINTS ARE BEING RUN AUTOMATICALLY WITHOUT BEING PUSHED TO PRODUCTION. If running automatically then the S3 directory which will be the printer hotfolder (so “/printer-hotfolder”) would be added here and the Production Integration “Generic Hotfolder” would not need to be set up.
9 - S3 Access Key = The access key generated in AWS when the IAM user was set up should be copied here. This field will be the same on every production centre.
10 - S3 Secret Key = The secret key generated in AWS when the IAM user was set up should be copied here. This field will be the same on every production centre.
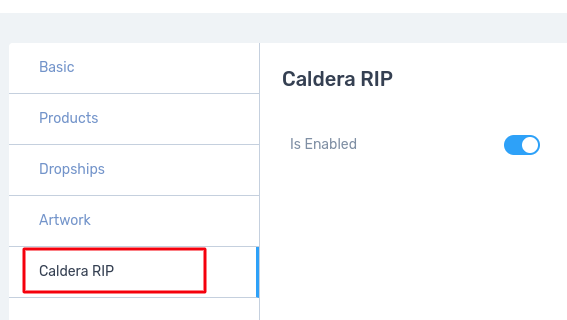
Once this has been configured on each Production Centre then the Job Templates connected to these will have a tab visible on their settings called “Caldera RIP”, each template that needs to use this integration should be toggled to enabled. See Screenshot below.
Setting up the Kornit X Generic Hotfolder Production Integration
Under SETTINGS > COMPANIES, each Production Centre in the Kornit Platform has a tab called “Production Integrations”, on each the Integration called “Generic Hotfolder” needs to be configured. They can use the same AWS S3 Credentials.
The screenshot below shows the integration settings, the numbers in red have been added and a guide below explains what should be added to these.

1 - Enabled = Toggle on or off to enable the integration
2 - Auto Transfer Enabled = should be OFF for this use case
3 - Production Sheet enabled = should be OFF for this use case
4 - Use Legacy Production Sheet Rules = should be OFF for this use case
5 - Auto Ship Enabled = should be OFF for this use case
6 - Production Units Enabled = should be ON for this use case, this allows the QA scanpoints to work bypassing the print station
7 - Preferred Artwork Format - Should be blank for this use case
8 - Filesystem Type = Should be S3
9 - File System Root = should be the directory of the printer hotfolder set up in S3 (so “/printer-hotfolder” in our example)
10 - Artwork Path Format = Can be left blank
11 - Transfer Order = When using S3 and sending multiple filetypes at the same time, such as .tif artwork and .xml files it is possible that there has to be an order. For example if the hotfolder is connected to a RIP sometimes the XML has to be dropped last. This field allows you to achieve this by listing the extensions in order on seperate lines followed by "$”. For Caldera DTF rolls this field should be:-
tif$
jpg$
xml$
12 - .Disable HTML Head Requests = Should be set to OFF
13 - Bucket = The name of the bucket created to store these files, in our example in this document this was “DTFBucket1”. This field will be the same on every production centre.
14 - Region = The region the S3 bucket was created in should be added here, for example “eu-west-2”. This field will be the same on every production centre.
15 - Access Key = The access key generated in AWS when the IAM user was set up should be copied here. This field will be the same on every production centre.
16 - Secret Key = The secret key generated in AWS when the IAM user was set up should be copied here. This field will be the same on every production centre.
Setting up Caldera
Now that we have the Kornit X Platform and Amazon S3 configured we need to complete the setup on the machine running Caldera and the Kornit Presto printer.
On the machine running caldera set up local folders to handle the caldera input and output and the printer hotfolder. Using our example nomenclature from above this would be
/localpath/local-caldera-input/fabricname (*a folder for each fabric)
/localpath/local-caldera-output
/localpath/local-printer-hotfolder
In caldera "/localpath/local-caldera-input/fabricname" should be set as the input hotfolder for each fabrics queue and "/localpath/local-caldera-output" should be set as the output path for all queues.
Now we have the syncing folders set up there are some steps that need to be followed to connect up to the Kornit X platform.
Step 1 - Install Docker
The file sync solution Kornit X have created requires the Caldera machine to have Docker installed to run. Instructions on how to install Docker on Debian are available here https://docs.docker.com/engine/install/debian/.
Step 1 - Create the configuration file
Create a yaml file to hold the configurations for the file sync. This file should be called caldera-sync-config.yml
Below is an example of this files contents using our example values
aws:
key: AKIA55HL2ZOSR5UDGLM6
secret: *****
region: eu-west-2
caldera_inputs:
-
bucket: bucketname
from: caldera-input
to: local-caldera-input
caldera_outputs:
-
bucket: bucketname
from: local-caldera-output
to: caldera-output
file_count: 9
print-inputs:
-
bucket: bucketname
from: printer-hotfolder
to: local-printer-hotfolder
file_count: 9
The same is below with more field explanation
aws:
key: YOUR AMAZON KEY
secret: YOUR AMAZON SECRET KEY
region: BUCKET REGION EG eu-west-2
caldera_inputs:
-
bucket: NAME OF S3 BUCKET
from: S3 CALDERA INPUT FOLDER
to: LOCAL CALDERA INPUT FOLDER
caldera_outputs:
-
bucket: NAME OF S3 BUCKET
from: LOCAL CALDERA OUTPUT FOLDER
to: S3 CALDERA OUTPUT FOLDER
file_count = INTEGER VALUE OF EXPECTED NUMBER OF OUTPUT FILES (USUALLY 9)
print-inputs:
-
bucket: NAME OF S3 BUCKET
from: S3 PRINT HOTFOLDER
to: LOCAL PRINT HOTFOLDER
file_count = INTEGER VALUE OF EXPECTED NUMBER OF OUTPUT FILES (USUALLY 9)
Important Information: YAML files are very particular about indentation, they must be indented correctly using 2 spaces.
Open the terminal on the Caldera machine, a command will be input and run which will run continuously and perform the sync, the terminal should not be closed or the sync will stop. If the machine is rebooted the sync should be triggered again by performing step 3 only.
The command is as follows (using examples)
sudo docker run -v /localfilepath/KornitXHotfolders/:/hotfolder -v $HOME/caldera-sync-config.yml:/usr/src/kornitx-caldera-sync/config/config.yml gateway3d/caldera-sync
Related Articles
Production Integrations: Caldera Prime Centre
Caldera Prime Centre Integration Help Like other production integrations this should be enabled on a PRODUCTION CENTRE company if it is required. For this particular integration all it requires is to be enabled and for you to add your Local Output ...RIP Integrations: Aeoon
Introduction This RIP Integrations allows Kornit X to utilise Aeoon to RIP your artwork files in advance in the cloud and have the 1bit files ready for printing in our Floor module. Integration Setup The RIP integration is configured on a Production ...RIP Integrations: ColorGATE
Introduction This RIP Integrations allows Kornit X to utilise ColorGATE to RIP your artwork files in advance in the cloud and have the 1bit files ready for printing in our Floor module. A basic workflow of the ColourGATE RIP can be seen here ...RIP Integrations: PDF Toolbox
Introduction This RIP Integrations allows Kornit X to utilise PDF Toolbox to RIP your artwork files in advance in the cloud and have the 1bit files ready for printing in our Floor module. Please note RIP Integrations can only be set on Production ...RIP Integrations: Kornit QuickP
Introduction To integrate Kornit X and Kornit QuickP in to one singular workflow we must use the RIP integration 'Kornit QuickP Auto Crop'. This RIP integration is simple to set up and does two important things: 1. The Offset X and Y are dynamically ...